
Adventures With Wigs
- Fern Lynch-Bowers

- Oct 23, 2020
- 3 min read
Updated: May 3, 2021
Hello world! So its been a while since I last made a blog post but never fear, I’ve been busy behind the scenes completing my first year (which I passed with flying colours!) starting my second year and practicing my wig skills.
So in my last post I mentioned that I dusted off my ventilating skills, well I finally finished moustache - just in time to transform myself into a man for one of my last units of first year. I started a new moustache project last week but this time its destined to be a big curly victorian affair. I still didn’t work from a reference photo (sorry Lara!) But it’s not yet for anything specific.

It’s not yet finished, but once I have finished the left side I am going to attempt to cross knot the middle area to try and mimic natural growth.

I was inspired to make it after me and my glamorous older sister Holly found these joke face masks in a shop in Buxton.
I progress my knotting skills, my next challenge is to learn how to add a lace-front to a hard-front wig. I have invested in some wig making supplies: my own cork filled block, wefting sticks, drawing mats extra hooks and holders and a few small bundles of human hair. I also ordered my own copy of ‘Wig Making and Styling: A Complete Guide for Theatre & Film’ - I got fed up of trailing it to and from the university library! I have some scraps of different lace to use for these smaller projects but I will need a decent amount of lace in the near future along with more hair as I progress.
Another thing I have been working on is my competency at wig styling. Whilst I am fairly proficient at performing roller sets on an actual head of hair, I have struggled to wrangle synthetic wigs. I practiced on a wig at uni but it turned out less than perfect.

This is the practice wig, as you can see the brick pattern you look for in a roller set isn’t very discernible and there is lots of stray hairs!

This is the result of the first set (I had to take it home to finish it) there is a wave forming and there’s some nice root lift but there’s not a lot of definition.

This was my second attempt with the first wig, still not a very good end result but the starting roller set is much better, the brick pattern is much more defined and there are less flyaways.

I think the waves are slightly more defined and regular but the root lift isn’t there. I also didn’t use a steamer on this wig
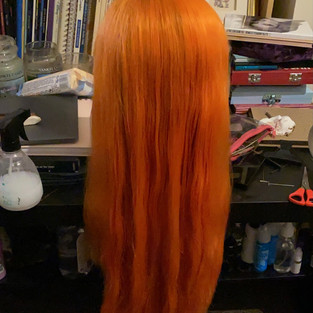
Ive since had another practice on one of my own personal wigs but I first had to spend several hours washing and detangling it. My wig is a lace front with a full stretch cap. I had to separate out each weft that is sewn into the cap, spray it down with diluted fabric softener and use a wide, cushioned Denman brush to detangle the hairs. Whilst had each weft separated out I also added in a dark root with an eyeshadow. There is a better way to do this with acrylic inks but I do not yet have any of these so I used a root touch up powder.
Below is the process of my orange wig from the start, halfway through the detangle and shadow rooting, the fully detangled wig, the roller set and finally how I am starting to style it! I am pleased with set, the brick pattern went in as planned, there were almost no stray hairs but I did run out of plastic rollers so I had to use bendy rollers right at the front which took up more room and the curls didn’t come out very well defined. I did use a steamer on this wig and I plan on steaming these waves in again. I sectioned off the hair at the crown and put in two dutch braids and rolled the off-the-scalp section into a small bun on either side - also known as ‘space buns’ with the remainder of the hair I brushed the curls out and I’ve placed in some long slides to define the waves as I steam it.




I shall post an update if it goes well! If it doesn’t…well I’ll have another go!
Stay safe!
Fern xx


Comments